Installation
Supported Versions
Note
To get full support of all features in PowerMax for Splunk 3.x you will need to have your array u-code at level 5978.7xx.xxx (Hickory SR) or newer and use both Solutions Enabler 9.2.1 and Unisphere for PowerMax 9.2.1. PowerMax for Splunk uses new efficiency statistics which are only available in the Hickory SR release. If your array is lower than 5978.7xx.xxx then these statistics will not be reported on in PowerMax for Splunk.
Note
PowerMax for Splunk has been tested and verified only against Python 3.x. There is no support for Python 2.x, it reached end-of-life in January 2020.
Enable Unisphere Performance Metric Collection
To enable Splunk to gather performance data on the array(s) in your environment it is necessary to first enable performance metrics for the given array(s) by registering the system to collect performance data. To register your array(s) follow these steps:
1. Log in to Unisphere and navigate to Settings > Performance > System
Registrations.
2. Beside All click the arrow to reveal the local arrays to that instance of
Unisphere.
3. For each array that you want to register for performance metrics check the
box under Diagnostic.
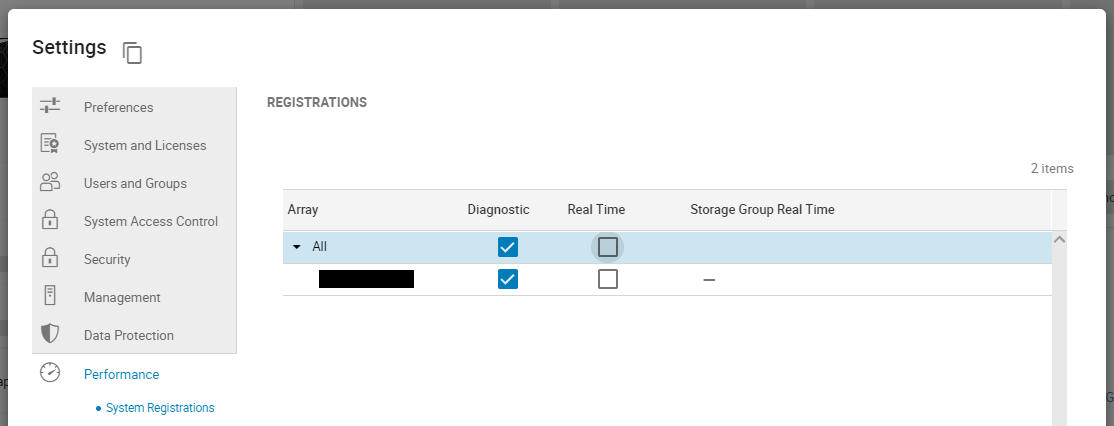
Click
Applyto apply the changes.
4. With the registration process complete after 30 minutes Unisphere will start recording performance metrics which can be ingested into Splunk.
For more information on Unisphere for PowerMax performance registrations please
consult the official guide via the Unisphere UI in Help Options >
Online Help.
Setup Unisphere User Account
It is highly recommended that before using PowerMax for Splunk to capture data a Splunk specific user profile is created in Unisphere with the required read-only roles.
1. Navigate to Settings > Users and Groups > Local Users, click Create
to create a new user.

2. Set the Username and Password as standard, select the array you want
to collect data for in Splunk under the System heading.
3. Set the following roles only; Auditor, Monitor, and PerfMonitor.
PowerMax for Splunk does not require any further roles.
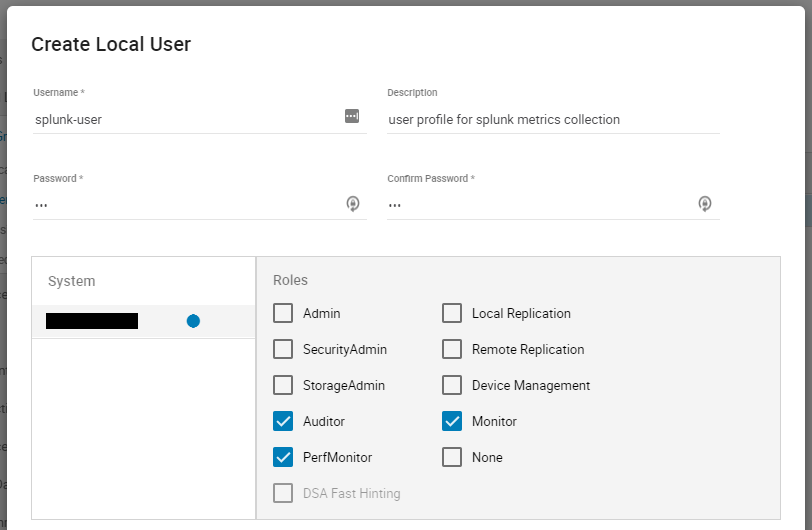
4. Click OK to to create the user. It is now ready for use in Splunk data
input configuration.
SSL Configuration
SSL is enabled by default in the TA when adding inputs. In order to retrieve the required certificate from Unisphere follow the following steps:
1. Get the CA certificate of the Unisphere server. This pulls the CA cert file
and saves it as .pem file:
$ openssl s_client -showcerts -connect {unisphere_host}:8443 \
  </dev/null 2> /dev/null|openssl x509 -outform PEM > unisphere.pem
Where {unisphere_host} is the hostname or IP address of your Unisphere for
PowerMax server. By default Unisphere uses port 8443 so you will need to
change this if not using the default Unisphere port.
Note
Step 2 is optional, if you prefer you can specify the path to the certificate when configuring your data inputs in Splunk. If you prefer this method please skip to step 3.
2. OPTIONAL STEP: If you want to add the cert to the system certificate bundle
so no certificate path is specified in the PowerMax data input, copy the
.pem file to the system certificate directory as a .crt file:
$ sudo cp unisphere.pem /usr/share/ca-certificates/unisphere.crt
Update CA certificate database with the following commands:
$ sudo dpkg-reconfigure ca-certificates
$ sudo update-ca-certificates
Check that the new unisphere.crt certificate will activate by selecting
ask in the new dialog window. If it is not enabled for activation, use the
up and down keys to select, and the space key to enable or disable.
3. If step 2 is skipped, the cert from step 1 will remain in a local
directory on the Splunk host. You can specify the location of the .pem
cert in the TA data input setting SSL Cert Location. Otherwise, leave
SSL Cert Location blank and Enable SSL enabled to use the cert from the
system certificate bundle configured in step 2.
Installing the TA and App
The PowerMax for Splunk TA can be installed from the Unisphere UI in two ways:
1. Installed from local copies of the TA and App .spl files downloaded from
Splunk Base.
or…
2. Installed directly from the Splunk Enterprise UI via Find More Apps and
searching for PowerMax. The TA and App will appear in the search,
simply click install for the add-on to install it in your Splunk environment.
You will need to restart to complete the installation process.
For the remainder of this section the process of installing from a local file will be detailed.
Download the TA and App from Splunk Base.
2. From your Splunk home screen, click the cog icon beside Apps to navigate
to the Apps section.

3. Within the Apps section, click the button Install App from file in the
top right corner of the page.
4. Click Choose File, select the PowerMax Add-on for Splunk, and click
Upload.
5. Once the upload is complete you will be prompted to restart Splunk to
complete the installation, click Restart now. When Splunk restarts,
navigate back to the home screen and you will now see a dashboard panel for the
PowerMax for Splunk TA.
6. Repeat steps 2 to 4 to install the PowerMax for Splunk App, you will not be prompted to restart on this occasion as the App does not require it.
Note
The process for adding arrays to the Splunk environment is detailed in the Configuration section of this documentation.
Note
There is an additional configuration step required for the App to function correctly if using indexes other than the Splunk default index, this is detailed in the Configuration section of this documentation.